Hello everyone,
This is the first entry of the year and I am hoping that everyone has started this 2019 successfully and with positivity.
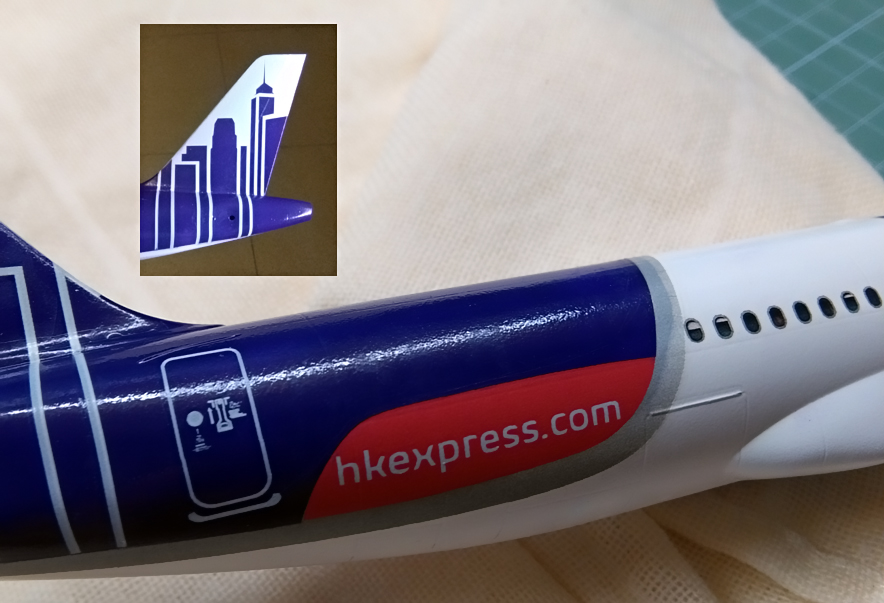
I find myself currently working on an A320 which ended up being a Neo variant with the Hong Kong Express livery colors.
I was designing this livery and at the same time thinking that it would be a challenge because of its design with white colors and that was something that I needed to fully test.
I must say that I am adjusting the A350 decals (as well as fine tuning some aspects of the A320 decals after the experience with the HK livery).
The approach I took with this livery was to have white decals instead of purple decals that would wrap the end of the fuselage.
This decision was taken after seeing that the purple decal would be just too big and difficult to place and also because the colors of the engines must match the color of the fuselage.
So I saw this livery “in reverse” making the background of the tail instead of the purple design.
Now, I was able to fully test the white opacity and also test a little bit further the decals positioning.
I must say that the film is very thin but it is surprisingly resistant, the edges are practically invisible. I hope to post a video soon of some of the process I did while placing the decals.
I would like to write my opinion about white decals in general.
I won’t state this at 100% because I haven’t tested white decals from model kit manufacturers but, I do believe that it is near impossible to have white (and I mean, pure white) on a dark surface in one go, (with decal papers) you can though see it white when the white decal isn’t big enough to tell the difference.
I have to clarify that the small white decal on a dark surface looks indeed pure white, but when decals are big such as the background of the Hong Kong Express tail, you can start to see the difference when comparing to the white of the fuselage.
This makes sense, if we take for example that you want to paint a dark surface with a white spray can, the normal procedure would be to apply thin layers until getting the desired finish. Decals are thin regardless of the ink used for the white, so we are simulating the way we would paint a surface.
My approach for this Hong Kong livery was to use 3 layers of white decal for the tail section, this allowed for a whiter surface that gives the desired result. The film I am using is only 7 micron, so having 3 layers of decal on top of each other is no issue at all for the specific properties of this film.
You can always opt to use two white layers if the result is already satisfying for you.
I am very cautios about which decal goes where and more importantly, which color is beneath which decal. For bright colors going on dark surfaces such as the now old yellow crane of Lufthansa onto the blue tail, I will be including two white underlaying decals for the bright color to stand out.
Of course it is optional how many decals you want to use, but from my point of view I must give as many possibilities as I can.

I will also be giving specific tips or instructions if a livery has a cheatline that divides two or more colors.
For example, I should have done a method that I did not do for this livery but that I did in my previous A350 China Airlines build. This consists in; first, painting the whole fuselage white, then applying the grey cheatline and once dry, apply a gentle gloss coat over it to protect it.
Once protected, mask tape the outline of the cheatline and proceed to paint the purple color. This is specially needed when a cheatline goes across a certain section of the fuselage and we don’t know exactly where to divide the colors.
Besides the specific tips, I also include a black colored decal sheet printed on a regular paper in order for you to easily see which white decal is what.
I will keep on working with this project and post the photos of the finished model very soon.
Best wishes,
Guillem


